
Nancy Mahoney
Author, teacher and fabric designer Nancy Mahoney has enjoyed making quilts for over 25 years, during which time many of her quilts have been featured in books and both national and international quilt magazines. She has created over 100 quilt patterns and always has more books and patterns in the works. She has designed 15 fabric collections for P&B Textiles and Clothworks.
Nancy believes making a quilt should be fun. She wants students in her classes to have a good time, learn something new, and make a quilt they will enjoy for many years.
Website: www.nancymahoney.com
Lecture: Mastering Color
Friday afternoon
Are you are trapped in a rut of always using the same colors? Do you want a better understanding of how to choose colors for any style of quilt? Color choices don’t have to be intuitive or instinctive-there is a practical way to choose color for quilts. In this presentation, you’ll find useful techniques and guidelines for making the perfect color choices for any quilt. Take the guesswork out of putting colors together and see innovative ideas for fresh color combinations
Class: Twisted Triangles
(3 hours – Friday morning)
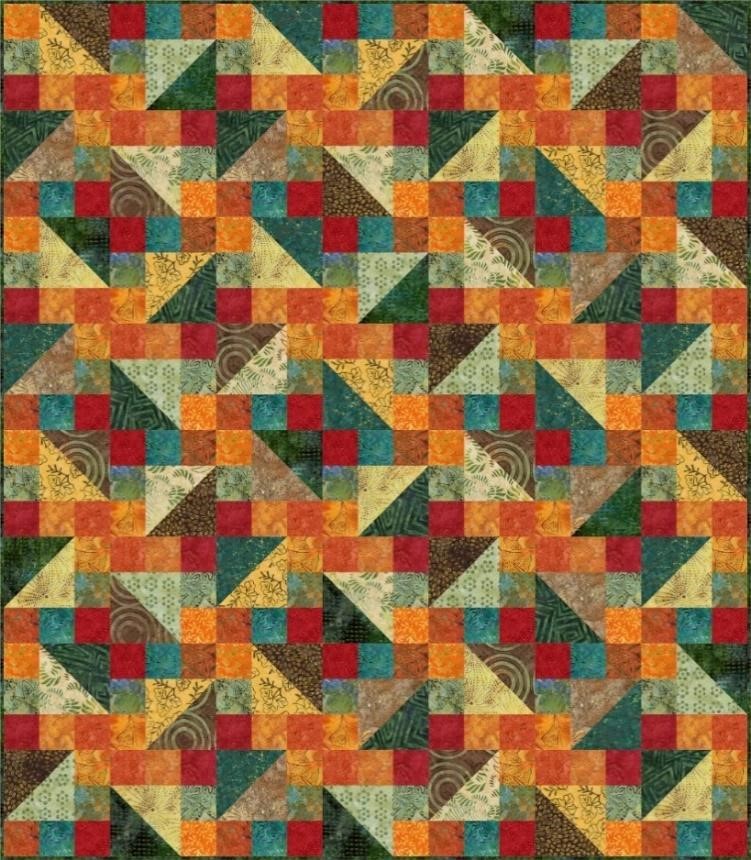 In this fun class, you’ll learn 10 different ways to make half-square triangles! This stash-busting lap-size quilt is perfect for fat quarters, fat eighths, or Tonga 6-pack strips. The blocks are oh-so-easy to make and look great in any color combination. Quilt size: 53″ x 60″.
Fabrics
- 1 fat quarter (18″ x 21″) each of 20 assorted prints*
- 3¹⁄₂ yards of backing fabric ¹⁄₂ yard of fabric for binding
* You can use 1 Tonga Treat 6-pack (precut 6″ x 42″ strips) of 20 prints. For a scrappier look, use 40 different fat eighths (9″ x 21″).
Tools
- Rotary Cutter (45 mm)
- Cutting Mat (12″ x 18″ or larger)
- Rulers: 6″ x 12″ ruler and 6 ¹⁄₂” square ruler
- Sewing Machine
- Basic Sewing Supplies (scissors, pins, thread, seam ripper, and any special sewing tools you use.)
Cutting (before class)
From each of 10 assorted prints, cut:
– (2) 6″ x 21″ strips; crosscut into (6) 6″ squares
From each of the remaining 10 prints, cut:
– (4) 3″ x 21″ strips; crosscut into (28) 3″ squares
From the binding fabric, cut:
– (8) 2¹⁄₄” x 42″ strips
Class: Dot to Dot
( 6 hours – Saturday)
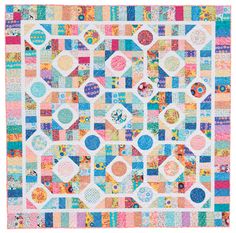 This charming little quilt is one of Nancy’s most popular designs. Class time begins with using strip piecing techniques to make the patchwork blocks. Then we’ll shift our focus to easy invisible machine appliqué techniques. You’ll receive tips for sewing accurate patchwork and all aspects of invisible machine appliqué. Learn how to use your sewing machine to achieve finished appliqués that look hand stitched.
Pattern included for each student.
Finished size: 59″ x 59″. Based on Simple Circles and Quick Curves book.
Fabrics
- 33 fat eighths (9″ x 21″) of assorted medium/dark prints for blocks
- 1⅝ yards of light background print for blocks and inner border
- 1¼ yards of medium print for outer border and binding (not needed for class)
- 3¾ yards of backing fabric (not needed for class)
Other Materials
- 5″ square of heat-resistant template plastic*
- Ultra-fine point Sharpie permanent marker for tracing shapes on template plastic
- Neutral thread for patchwork
- 60 wt thread to match background (white)
- Machine needles – Microtex sharp 60/8 (preferred) or 70/10 for machine appliqué
- Clear monofilament or invisible thread for appliqué **
- Water-soluble fabric glue (Quilter’s Choice, Glue-baste-it, or Jillily Studio appliqué glue). A glue stick is not suitable.
* Available for purchase in class
** To achieve the desired results, I use monofilament or invisible thread. However, if you do not want to use invisible thread, bring 60 wt thread that matches the fat quarter prints.
General sewing supplies
- Sewing machine with blanket or zigzag stitch and appropriate presser foot (open-toed embroidery foot recommended)
- Rotary cutting mat, cutter and ruler (6″ x 14″)
- Sharp scissors for cutting fabric
- Paper scissors for cutting template plastic
- Iron and ironing board
- Pencil or other marking tool for tracing shapes
- Any other favorite tools you like to have on hand when sewing
Cutting (before class)
- Bring leftover fat eighths to class to use for appliquéd circles.
- From each of 26 assorted medium/dark prints, cut:
– (1) 2¼” x 21″ strip
– (3) 3½” squares (6 are extra) - From each of 7 assorted medium/dark prints, cut:
– (2) 2¼” x 21″ strips
– (4) 3½” squares - From the light background print, cut:
– (6) 7½” x 42″ strips; crosscut into:
(25) 7½” squares
(24) 1½” x 7½” rectangles
– (6) 1½” x 42″ inner-border strips
Class: Knockout Rose
(3 hours – Sunday morning)
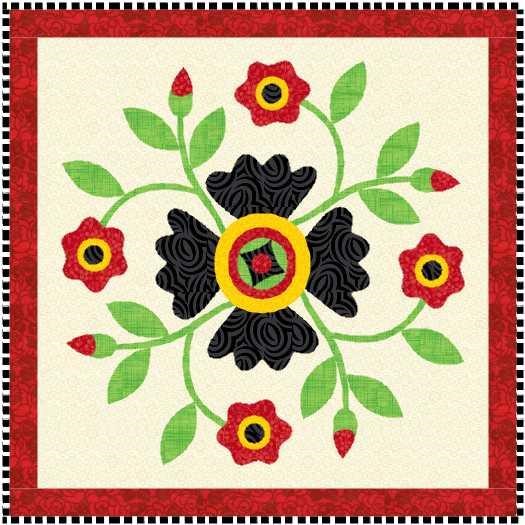 Layer and fuse a floral appliqué without bulk or stiffness. Learn how to use various fusible products to create blocks with circles, stems, and sharp points. Nancy’s instructions will have you confidently completing your block even if you haven’t machine appliquéd before. Block pattern included for each student. The pattern for Nancy’s Knockout Roses quilt is in Quilting with Fat Quarters (Martingale, 2013).
$5.00 material fee due in class for full-size appliqué patterns
Fabrics
- 1 fat quarter (18″ x 21″) of light background print
- 1 fat eighth (9″ x 21″) each of red, green, yellow, and black prints
Other materials
- 1 yard of 12″-wide Misty Fuse fusible web*
- ¹⁄₄” bias tape maker for making stems
- 60-weight thread to match appliqués
- 70/10 Microtex Sharp sewing machine needles
- Reynolds Brand parchment paper (18″ or larger piece)
*Fusible web will be available for purchase during the workshop.
General sewing supplies
- Sewing machine with blanket or zigzag stitch and appropriate presser foot
- Sharp scissors for cutting fabric
- Paper scissors for cutting fusible web
- Iron and ironing board
- Any other favorite tools you like to have on hand when sewing
Cutting (before class)
- From light background print, cut:
– (1) 17″ square